
Growing Ginger in a Cold Climate
Introduction
Growing warm-loving crops like ginger in a cold climate can feel a bit intimidating, but it is entirely possible to harvest your own flavourful rhizomes. By mimicking its native tropical environment and following these essential guidelines, you can turn a kitchen scrap into a garden treasure.
Understanding its Natural Habitat
Ginger is native to the tropical forest regions of Southeast Asia, where it thrives in warm, moist, and dappled environments. In the wild, rhizomes are planted at the break of the rainy season and harvested 8–10 months later.
For cold-climate gardeners with an outdoor window of only 4–5 months, this is a challenge. Because of our shorter season, many northern growers harvest what is known as "Baby Ginger." This younger version is milder, features a beautiful pink-tipped hue, and lacks the tough, fibrous skin of mature ginger. While the taste is delicate, it still packs a vibrant punch of flavour.
When to Start
The secret to success in the North is a massive head start. I typically start my ginger between February and early March. Why so early? Ginger is notoriously slow to "wake up." It can take 4–6 weeks just to see the first green shoot break the surface. By starting in late winter, you give the plant a 3-month lead indoors, ensuring that when the soil finally warms up, you’re transplanting a growing plant rather than a dormant root.
Pro Tip: I buy organic ginger from the local grocery store, break it into smaller pieces (ensuring each has a few "eyes" or buds), and let them callous over for 24–48 hours before planting. This curing process prevents the root from rotting once it hits the water or soil.
Growing Tips: Two Ways to Start
I like to use different methods depending on how much space I have. Here is how you can get yours moving:
Method 1: The Water Start (My Favourite!)
I personally prefer starting my ginger in water on a sunny windowsill. This saves precious space in my grow room for seedlings that require intensive light.
The Process: Submerge the bottom half of your cured rhizome in a shallow dish of water.
Maintenance: Replace the water every few days to keep it fresh and oxygenated.
The Result: Eventually, the ginger will develop nodes, roots, and shoots. You can keep it in water until transplanting time or move it to a small pot once the roots are established.
Method 2: The Soil Start
This is the more traditional route and works well if you have extra space under grow lights.
The Soak: Before planting, soak your cured rhizomes in warm water for at least one hour. This rehydrates the root and signals to the "eyes" that it's time to grow.
The Process: Plant the rhizomes 1–2 inches deep in a rich potting mix.
Maintenance: Keep the soil consistently warm (a heat mat helps significantly here).
The Result: This method often results in a sturdier root system earlier on, making the transition to the garden very smooth.
Container Growing: The Cold Climate Advantage
If you live in a region with unpredictable spring frosts or very short summers, growing ginger in containers is a game changer. * Portability: If a surprise frost is forecasted in late May or early September, you can simply carry your pots inside.
Soil Temperature: Soil in pots warms up much faster than the ground, which ginger absolutely loves.
Depth: Ensure your container is at least 12 inches deep and wide, as ginger grows horizontally.
Growing Ginger in Felt Containers
Transplanting into the Garden
Timing is everything. Do not transplant your ginger until the danger of frost has passed and nighttime temperatures are consistently above 13°C (55°F). Ginger is a tropical princess; if the soil is too cold, it will simply stop growing.
Location: Choose a spot with rich, well-draining soil. Aim for filtered light or morning sun. Avoid areas with harsh, direct afternoon sun, which can scorch the leaves.
Watering: Keep the soil like a wrung-out sponge. If the leaf tips turn brown, your ginger is thirsty!
Feeding: Ginger is a heavy feeder. Give it a boost with a liquid fertilizer once a month to encourage those rhizomes to expand.
Harvesting
You’ll know your ginger is reaching its peak when the leaves begin to yellow and die back. However, you can "sneak" a harvest earlier; just remember that the longer it stays in the ground, the more intense the flavour becomes.
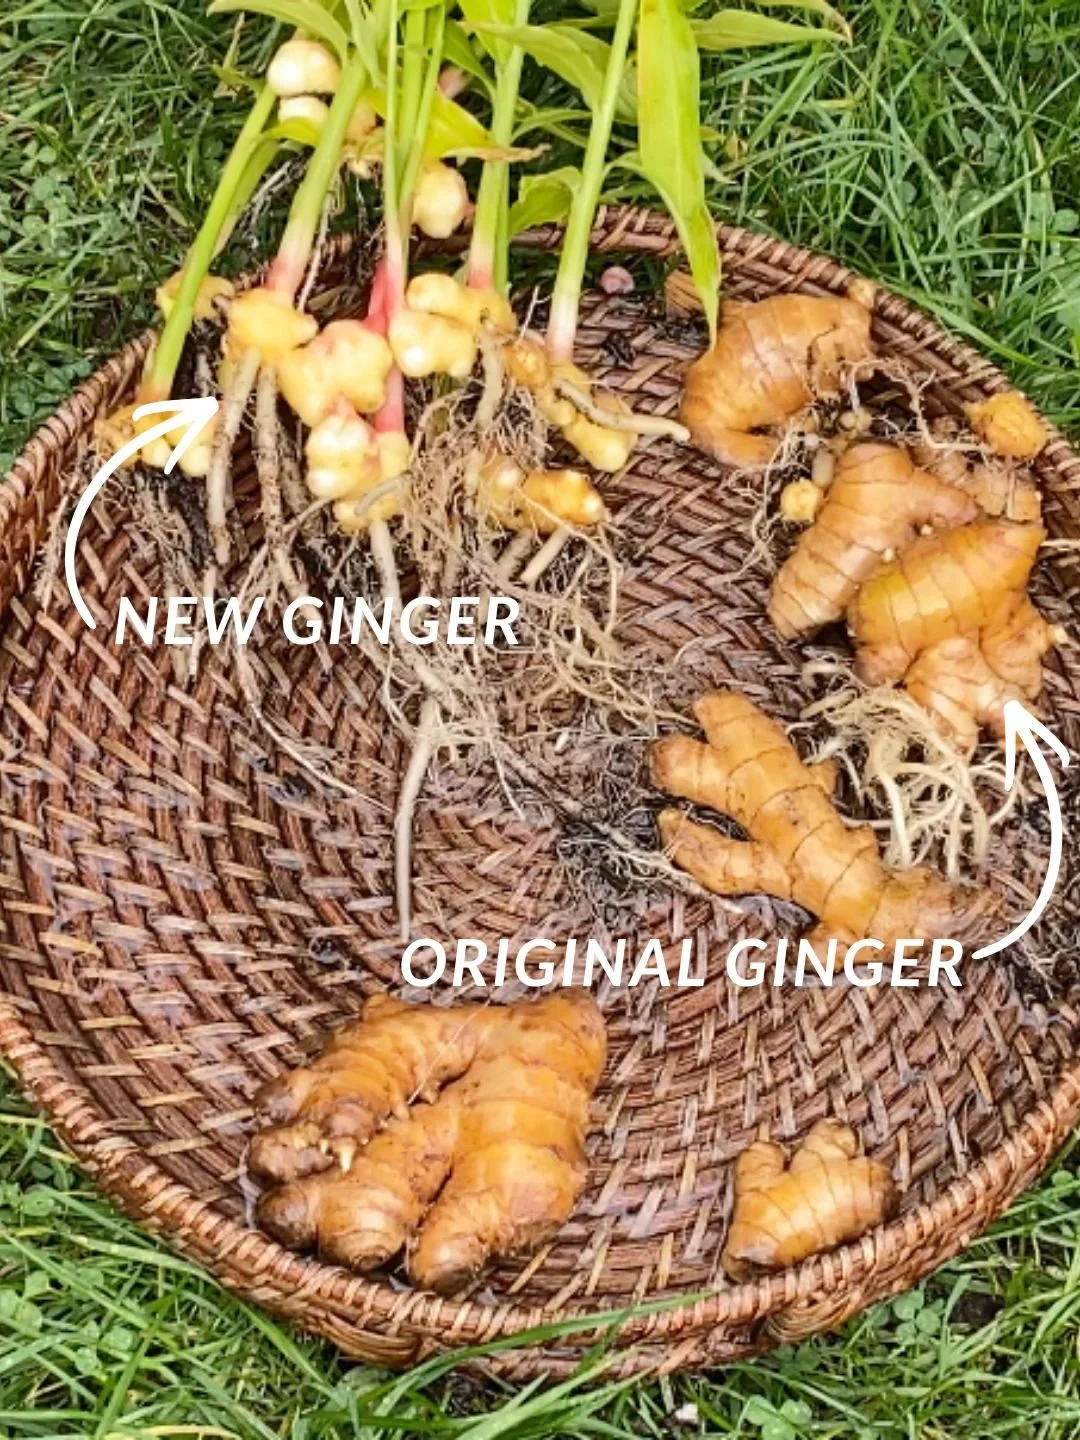
When you dig up your patch, you’ll notice two distinct parts:
The "Mother" (Old Ginger): This is the original piece you planted. It will be darker, tougher, and more fibrous. You can dry this and grind it into powder!
The New Rhizomes: These will be light-coloured, plump, and have that characteristic thin, "baby" skin.
Closing Thoughts
And that’s it! With a little bit of patience and an early start indoors, you can bring a taste of the tropics to your northern backyard. There is nothing quite as satisfying as grating ginger you grew yourself into a tea or stir-fry.